
1. Get started by setting up your Facebook Page
If you already have a personal account, you can click on the
“Create a Page” link at the bottom of your news feed or you could go directly
to “Create a Facebook Page” if you don’t have a personal account.
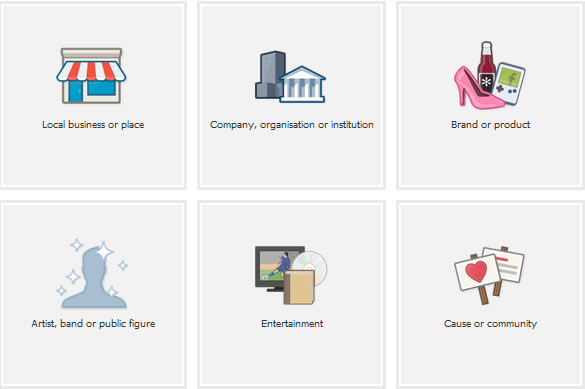
2. Choose the type of Facebook Page
You can select a type of business or category and depending
on your selection, you may also have to choose a subcategory. There are 6 main
categories to select:
After you have selected the category, you will be required
to name the Facebook Page and if you selected “Local business or place”, you
need to add address, city, postal code and phone number. Agree to the Facebook
Pages Terms and hit the Get Started button.
3. Add a logo or picture
Upload/import from a website your logo or picture that
represents your business or organization. This picture will show on different
parts of Facebook, like in news feed and your Timeline when you post an update.
If you don’t have a picture, don’t worry you can upload it in the future. Click
the Save photo or Skip button.

4. Tell the world what your page is about
Provide a basic description of the page or your business.
Add your website and related links (Blog, Twitter, Linkedin, Yelp, etc.). This
step is very important for Search Engine Optimization (SEO). You can also
modify or add this information in the future. Click the Save info button.

5. Choose your unique Facebook web address (URL)
Choosing your unique web address will make your URL www.facebook.com/yourbusinessnamehere.
You can’t modify this information in the future, but can choose it in the
future by going to the Username page.

YOUR PAGE HAS BEEN CREATED
Now your Facebook Page is almost ready, you just need to add
the cover photo that is available with the new Timeline design, add applications
and add other information that you skipped before (profile picture, about
information, links, URL). Go to manage and
edit page to modify, add information or manage permissions. You can add
business hours, and more information related to your business in the “Basic
Information” on the left. You can select the option of letting anyone post on
your Timeline or select if anyone can add photos/videos to your Timeline
(Manage permissions menu).
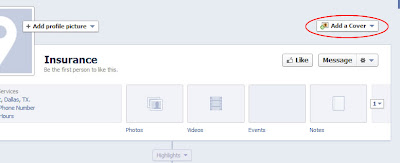
6. Set your cover photo
Select the “Add a Cover” menu on the right hand side and
upload a photo. The cover photo dimensions are 851 x 315 pixels. Choose a photo
that is representative to your brand. You can change it as often as you wish
and don’t be afraid to be creative with it. Keep in mind that you need to adhere
to Facebook’s policies regarding cover photos, which states that cover photos
cannot include:
- Price or purchase information, such as “30% off” or “Download it at our website”
- Contact information such as website address, email, phone number, mailing address, or information that should go in the “about” section
- References to Facebook actions or features, such as “Like” or “Share” or any other Facebook site feature
- Calls to action, such as “Get it now” or “Tell your friends”
7. Organize your views & Facebook apps
Timeline, the new design of Facebook features photos, likes,
map and apps at the top of your page below your cover photo. Photos are
automatically featured in the first spot, but page admins can rearrange the
other to feature the most important one first. Some apps will require that the
user clicks the dropdown arrow.

8. Fill up your Facebook Timelime
Start by adding the date that your business was founded or
opened. You can even add a location and pictures.
YOUR FACEBOOK PAGE IS READY
9. Invite friends
The admin panel at the top of your page (for you admins)
will show you notifications, messages, likes, insights and tips. Select the
“Invite friends” link and select your friends.

10. Start posting updates and like us on Facebook
Now you can start sharing you website’s content and
information that can be useful for your fans. Remember to Like us on our
Facebook Page www.facebook.com/InsuranceWebsiteBuilder.
No comments:
Post a Comment